 Pitivi

Taking your foray into combining images and sound a step further, you might want to try video editing on Linux using another add-on application called PiTiVi.
Install Pitivi from the Add/Remove Software application from the Activities Overview. Do a search for "pitivi" for the quickest and most accurate search results. Install the software, accepting the certificate when asked.
Pitivi is designed to be a basic video editor that is easy to use but robust in what file formats it can ingest. Getting video off of a camera onto your computer is complex because there are so many different ways camera manufacturers choose to implement the transfer. Generally speaking, it breaks down into two methodologies: drag-and-drop from an SD card or similar media, or press play on the camera and record on your computer.
Importing Video from SD Cards
Plug in your camera or insert your media card and use them like an external drive. Drag the files into your Videos folder (reach this by clicking the Files icon in your Favourites bar in the Activities Overview). Now your video is imported.
Importing Video from DV Cameras
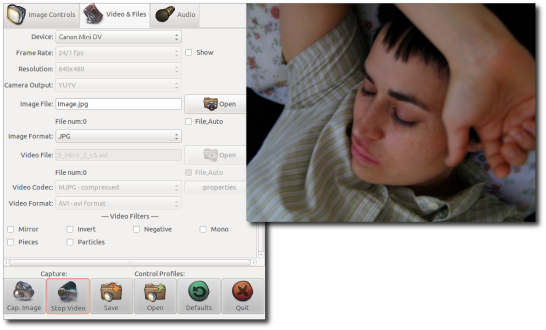
For this, you'll need an application to capture the video from the camera. You can use VLC or GUVCview
Install GUVCview from the Add/Remove Software application in the Activities Overview. Do a search for "guvcview" for the quickest and most accurate search results. Follow the prompts to install the software.
Connect your camera to your computer, turn it on, and open GUVCview. Click the Capture Video button at the bottom of GUVCview and then press play on your camera. It must capture the footage in realtime, so this is a longer method than the first, but it's unavoidable if your camera is tape-based.
Once the footage is captured, you can launch Pitivi and import your footage. All video editing applications, Pitivi included, really refer short, manageable, "bite size" video clips, so if possible you should import lots of short video clips rather than importing one monolithic video file. Either way, once the clips are in Pitivi, you can add them to the timeline and edit them.
Editing Video
Pitivi has all the typical features of a normal video editor; volume adjustment, fades in and out, the ability to splice, and so on. It's a solid video editor, with the support of an active and dedicated community behind it.
Create a new project in Pitivi according to the footage you have. If you have mixed sources of footage (ie, some dv footage, some 720p, some 1080p, and so on) then choose the size that you'll be exporting to.
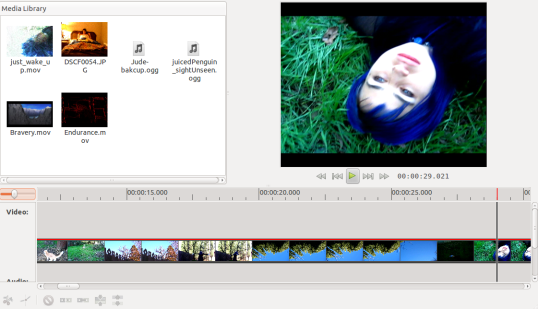
Import media into the project by dragging and dropping media from your Video folder on your computer to the Media Library in Pitivi. Or go to the Library menu and choose Import Files.
The workflow is simple; drag a video clip from the Media Library into the timeline below. Use the cutting tools in the lower left corner to trim off unwanted footage.
When you're happy with your edit, you're ready to export your movie to share with friends either online or on DVD. In the video world, this is called "rendering" your video; go to the Project menu and select Render.
The type of file you create depends on your intended destination; if you're going to post your video to the web, then use Ogg or Webm. For a keepsake version of the project without any loss of quality, use Matroska. If you intend to burn to DVD as your final output, use AVI.