If you're a geek online (and I have it on good authority that you are), then you may have come across sites like Github or Gitlab, and you may know them as places where programmers store their code. If you're particularly adventurous, you may have even downloaded an open source application from such a site. So, aside from a site full of $0 apps, what exactly is Git, any way?
Actually, Git is Git. Websites like Github and Gitlab only use Git and have nothing, on a technical level, to do with Git. This is important, because if you learn Github before you learn Git, then Git without Github will probably be confusing to you.
Websites use Git because Git is what programmers call a version control system, which is programmer jargon meaning that Git is an application that tracks changes you make to files. This allows you to reverse changes you don't like, or collaborate with other people and incorporate changes they've made into your own work. It's similar to a backup system, but it's much more specific than that, and is designed for granular control, distributed work, and remote access.
What this means for you depends on what you do on a computer. If you're writing a paper or a book, or a campaign for an RPG, or you're programming or doing web design, or you're a Linux user who likes to maintain your dot-files, or you're a chef and you have a stash of recipes, or any bulk storage of raw text, then Git could be useful to you. Git specialises in managing raw text: content generated by a text editor (like Atom, Emacs, or Notepadqq, and so on), because Git likes to compare files line by line. For instance, if I write a file like this:
Build a character in D&D is easy.
You can find instructions for this process on page 14 of the Player's Handbook.
Once I have committed this content to Git, it can tell when I've made changes to it. I can see a report about changes, and choose to either make them permanent, alter them, or reject them entirely. A Git diff looks a little like this:
- Build a character in D&D is easy.
+ Building a character in D&D 5e is easy.
+ First, go buy the D&D Player's Handbook.
- You can find instructions for this process on page 14 of the Player's Handbook.
+ Start on page 11 of the Player's Handbook.
It seems simple, but for large chunks of text, this kind of line-by-line management is an elegant way to manage text files that change often. I use Git for everything from articles, books, RPG campaigns, game design, and programming.
When not to use Git
Git isn't for everyone or everything. It might be overkill for you, or for a specific project. For instance, if the bulk of what you're generating is not text, then Git probably isn't the tool you need. While Git accepts any form of data you throw at it, it doesn't necessarily make sense to use Git for non-text entities. If you're not sure about something, you can create a temporary Git repository and do this simple test: create a file and commit it to Git, then change the file, and view the Git diff. If the Git diff doesn't show you the lines of text that changed from one version to the next, then Git probably isn't the optimal tool for that data format.
When to use Git
The thing that pushed me to Git as a tool for my personal work was my habit of doing my own version control, poorly.
When I was working on a book or a coding project, I'd inevitably reach some point when I felt the work was pretty good.
This made me hesitant to make major changes to it; what if I reworked a section of my work only to find that I'd done more damage than good?
Then what?
To combat this fear, I would save a good version of my work as something like myGreatWork-GOOD.txt.
The problem with this convention is that once you start doing that, it's hard to justify when to stop, and so before you edit anything at all, you feel compelled to make a -GOOD-030319.txt version, and then a -good-030419.txt version, and on and on.
Git basically does the same thing, except that it abstracts all of that versioning out from your workspace and manages it all on its own.
Git is relatively simple, if you're willing to learn new software that's probably unlike anything you've ever used before, and if you just use it by yourself as a way to manage versions of your important files. It gets complex the more it scales out. If you use it with remote servers (like Gitlab), a common use case, it becomes a little more complex. And if you start using it with other people, you risk encountering merge conflicts and other exciting situations that you'll never have encountered as a solo user. For this reason, I'm a proponent of starting off with it early. If you think Git might be a major component of an industry you're trying to get into, or if it just seems like it's smart technology, then start using it for stupid simple stuff, and let it grow up with you.
Installing Git
First, you need to install Git if it is not already on your system.
If you're using Linux, then you can install it with your package manager (yum on Fedora, apt on Ubuntu).
If you're not on Linux or BSD yet, you can install from git-scm.org but there are a few projects that have adapted the default Git package to your platform.
On Windows, try gitforwindows.org, which ships with a nice Git shell to help you access a UNIX-style console.
On can Mac OS, you can obtain Git from Homebrew, which takes a much more UNIX-like approach to the upkeep of the Git application than when you install it from a .dmg installer.
For Linux, BSD, or Mac Homebrew users, the only configuration required is to set a global username and email address so that your Git activity has your signature on it. Actually, even this isn't strictly required, but doing it now helps avoid issues in the future, so I recommend it.
$ git config --global user.name "Klaatu"
$ git config --global user.email klaatu@mixedsignals.ml
Now if you're on a Mac and you've installed from the downloadable installer instead of Homebrew, you need to update your PATH variable to include the location of the Git executable. Or, seriously, switch to Linux and make your life easier in the long run.
On Windows, access Git in the Git shell that got installed along with Git.
When you want a set of files to be tracked by Git, you must make a directory and then designate that directory as a Git repository.
Assuming your directory is called myproject
$ cd myproject
$ git init .
Now Git can track anything in myproject.
Git-cola for a GUI Git
If hanging out in a terminal window doesn't appeal to you, there's a cross-platform application called Git-cola that provides a GUI interface for Git file management.
If you're on Linux, using the KDE desktop, there are also plugins for Dolphin that brings Git integration right to your file manager.
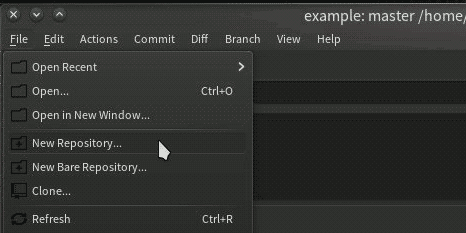
To create a new repository in Git-cola, click the New button on the introductory screen, select the folder you want to use as a Git repository, and then select File > New repository.
Git branch
When you create a repository, a branch called master is created for you.
A branch in Git is a workspace, or a sandbox.
It's a place you can work on stuff before making it "official" on the master branch.
When you're the only one using your Git repository, this is arguably superfluous, but it's still a good habit to get into.
Create a branch, and then list the existing branches:
$ git branch klaatu
$ git branch
* master
klaatu
If you're using the Git-cola GUI, you must first create a file to commit to the master branch before you can make a new branch for yourself. Common first commits are either a README.md file or else a .gitignore file. You must create these files in a file manager or text editor, and then you can refresh Git-cola and then add files and commit them:
And then commit the file to the repository so that a master branch is created.

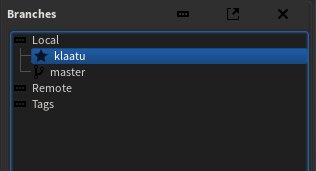
Then create a branch from the Branch > Create menu selection. Accept all defaults, and name your branch. Once created, your new branch is visible in the Branches panel:
After creating a branch, you're still in the master branch.
To activate your working branch, you must check it out:
$ git checkout klaatu
$ git branch
master
* klaatu
The add and commit cycle
That was set up. You'll only install Git once every few years, and you'll only create a new Git repository with git init maybe once a week or maybe once a month. Your daily interactions with Git involve 2 commands:
$ git add example.txt
$ git commit --message 'an example git commit'
The git add takes whatever file you point it at and tells Git to track it.
When Git tracks something, it watches that file for changes.
Git is (more or less) aware of changes in files that it is not tracking, but it takes no actions other than telling you that untracked files exist.
Adding a file tells Git to record all changes being made to a file.
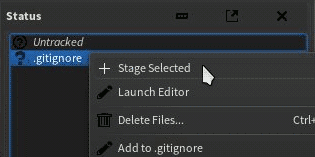
If you're using Git-cola, you add a file by right-clicking on the file in the Status panel and selecting Stage selected.
The git commit
If you're using Git-cola, you commit your staging area to your log by typing a commit message at the top of the Git-cola window, and clicking the Commit button.